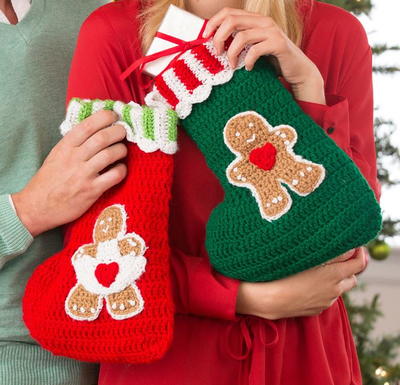
Yummy Gingerbread Crochet Stockings

These Yummy Gingerbread Crochet Stockings look good enough to eat. Of course, it's a good thing that this stocking pattern is not edible because they are also far too cute to eat. If you are looking for a crochet Christmas stocking pattern free of charge, then you have found a great one. The crochet patterns for these two stockings make it easy for you to crochet them up tonight for your whole family. These red and green gingerbread stockings are so festive that they are sure to bring a cheerful winter feel to your home this Christmas.
NotesNOTES:
Stocking is worked back and forth in rows beginning with ribbing at top.
Gingerbread boy and girl figures are made separately and sewn to stocking. Do not seam stocking until figure is sewn on front.
To change color, work last stitch of old color to last yarn over. Yarn over with new color and draw through all loops on hook to complete stitch. Proceed with new color. Carry color not in use along wrong side until next needed. Cut when instructed.

Crochet HookH/8 or 5 mm hook
Yarn Weight(4) Medium Weight/Worsted Weight and Aran (16-20 stitches to 4 inches)
Crochet Gauge16 sc = 5 (12.5 cm); 6 rows = 2 (6.5 cm) in alternating rows of single crochet and double crochet. CHECK YOUR GAUGE. Use any size hook to obtain the gauge.
Finished SizeStocking measures 10” at widest x 14” long (25.5 x 35.5 cm).
Materials List
- RED HEART® Holiday®: 1 ball 140 White/Silver A
- RED HEART® Super Saver®: 1 skein each: 319 Cherry Red B, 368 Paddy Green C, 672 Spring Green D, 336 Warm Brown E (Note: Only small quantities of D and E are needed for this project)
- Susan Bates brand crochet hook: 5mm [US H-8]
- Yarn needle
Instructions:
Special Stitches
sc2tog = [Insert hook in next stitch, yarn over and pull up a loop] twice, yarn over and draw through all 3 loops on hook.
sc3tog = [Insert hook in next stitch, yarn over and pull up a loop] 3 times, yarn over and draw through all 4 loops on hook.
Special Technique
Join with sc = Place a slip knot on hook, insert hook in indicated stitch, yarn over and pull up a loop, yarn over and draw through both loops on hook.
Join with sc2tog = Place a slip knot on hook, [insert hook in next stitch, yarn over and pull up a loop] twice, yarn over and draw through all 3 loops on hook.
Stocking (make 2 – Boy’s Stocking with A, B, and C & Girl’s Stocking with A, D, and B):
Ribbing
Beginning at top, with A, ch 11
Row 1 (right side): Sc in 2nd ch from hook and in each ch across, turn—10 sc.
Row 2: Ch 1, working in back loops only, sc in each sc across; change to 2nd color, turn. For all color changes, carry color not in
use along wrong side and do not cut until instructed.
Row 3: Ch 1, working in back loops only, sc in each sc across, turn.
Row 4: Ch 1, working in back loops only, sc in each sc across; change to A, turn.
Row 5: Repeat Row 3.
Row 6: Repeat Row 2.
Rows 7–38: Repeat Rows 3–6 eight times.
Rows 39 and 40: Repeat Row 3; change to 2nd color at end of Row 40. Do not turn.
Cut A.
Body
Row 1 (right side): With right side of ends of rows facing and covering carried yarn, sc in each row across; change to 3rd color, turn—40 sc.
Row 2: Ch 3 (counts as first dc here and throughout), dc in each sc across, turn—40 dc.
Row 3: Ch 1, sc in each dc across, turn.
Rows 4–17: Repeat last 2 rows 7 times.
Row 18: Repeat Row 2.
Row 19: Ch 1, sc in first 14 dc, 2 sc in next 12 dc, sc in next 14 dc, turn—52 sc.
Row 20: Ch 3, dc in next 13 sc, *2 dc next sc, dc in next sc; repeat from * 11 times, dc in last 14 sc, turn—64 dc.
Row 21: Ch 1, sc in each dc across, turn.
Rows 22–27: Repeat Rows 2 and 3 three times.
Row 28: Repeat Row 2.
Row 29: Ch 1, sc in first 20 dc, [sc2tog] 12 times, sc in last 20 dc, turn—52 sc.
Row 30: Repeat Row 2.
Row 31: Ch 1, sc3tog, sc in next 17 dc, [sc2tog] 6 times, sc in next 17 dc, sc3tog, turn–42 sc.
Row 32: Ch 1, sc3tog, sc in next 36 sc, sc3tog. Fasten off, leaving a long tail for sewing.
Ribbing Trim
Row 1 (right side): With wrong side facing and working in ends of rows, join A with sc in first row, skip next row, 5 dc in next row, *skip next row, sc in next row, skip next row, 5 dc in next row; repeat from * across leaving last row unworked. Fasten off, leaving a long tail for sewing.
Hanging Loop (make 2)
With A, ch 16.
Row 1 (right side): Sc in 2nd ch from hook and in each ch across. Fasten off, leaving long tail for sewing. Sew short ends together.
Gingerbread Figure (make 2)
Beginning at top of head, with E, ch 4.
Row 1 (right side): Work 2 sc in 2nd ch from hook, sc in next ch, 2 sc in last sc, turn—5 sc.
Row 2: Ch 1, sc in first sc, *2 sc in next sc, sc in next sc; repeat from * once, turn—7 sc.
Rows 3–6: Ch 1, sc in each sc across, turn.
Row 7: Ch 1, sc2tog, sc3tog, sc2tog, turn—3 sc.
Row 8: Ch 6, sc in 2nd ch from hook and in next 4 ch, sc in next sc, 2 sc in next sc, sc in next sc, turn—9 sc.
Row 9: Ch 6, sc in 2nd ch from hook and in next 4 ch, sc in remaining 9 sc, turn—14 sc.
Row 10: Ch 1, sc2tog, sc in next 10 sc, sc2tog, turn—12 sc.
Rows 11 and 12: Ch 1, sc in each sc across to last 2 sc; leave remaining sts unworked, turn—8 sc.
Rows 13 and 14: Ch 1, sc in each sc across, turn.
First Leg
Row 1 (right side): Ch 1, sc in first 3 sc; leave remaining sts unworked, turn—3 sc.
Rows 2 and 3: Ch 1, sc in each st across, turn.
Row 4: Ch 1, sc in first 2 sc, 2 sc in next sc, turn—4 sc.
Row 5: Ch 1, 2 sc in first sc, sc in last 3 sc, turn—5 sc.
Row 6: Ch 1, sc in each st across, turn.
Fasten off.
2nd Leg
Row 1 (right side): With right side facing, skip next unworked st of Row 14, join E with sc2tog, sc in last 2 sc, turn—3 sc.
Rows 2 and 3: Ch 1, sc in each st across, turn.
Row 4: Ch 1, 2 sc in first sc, sc in last 2 sc, turn—4 sc.
Row 5: Ch 1, sc in first 3 sc, 2 sc in last sc, turn—5 sc.
Round 6: Ch 1, sc in each sc across; working across ends of rows, in sts, and in opposite side of foundation ch, sc evenly spaced
around working 2 sc as needed at curved edges to keep piece flat; join with slip st in first sc. Fasten off.
Round 7: With right side facing and working in back loops only, join A with slip st in any sc, slip st in each sc around; join with slip st in first slip st. Fasten off, leaving long tail for sewing.
Heart (make 2)
With B, ch 2.
Round 1 (right side): Work 6 sc in 2nd ch from hook—6 sc. Do not join.
Round 2: Ch 1, (sc, ch 2, sc) in first sc, slip st in next sc, 2 hdc in next sc, ch 1, slip st in next sc, ch 1, 2 hdc in next sc, slip st in next sc; join with slip st in first sc. Fasten off, leaving a long tail for sewing.
Apron
Bib
With A, ch 5.
Row 1 (right side): Sc in 2nd ch from hook and in each ch across, turn—4 sc.
Rows 2–5: Ch 1, sc in each sc across, turn.
Skirt
Row 6: Working in ends of rows, sc in each row, turn—5 sc.
Rows 7 and 8: Ch 1, 2 sc in each st across, turn—20 sc.
Rows 9–11: Ch 1, sc in each st across, turn.
Fasten off, leaving a long tail for sewing.
FINISHING
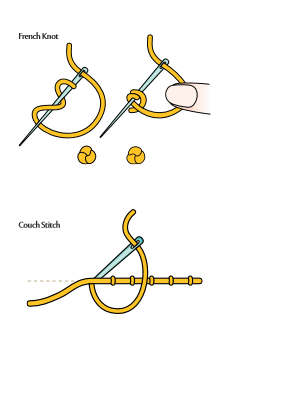
Use photograph as a guide for placement of stitches and figures. Fold stocking in half and choose one side as front. You may prefer to tuck in tails of pieces and figures as you sew to minimize weaving in ends. With A, embroider each figure with French knots for eyes and 3 French knots on each arm and leg. Embroider a smile with couch stitches.
Girl Sew heart to center front of apron skirt. Sew apron to figure. With A tail, sew girl to front of B-colored stocking.
Boy Sew heart to center of boy. With A tail, sew boy to front of C-colored stocking. Sew stocking seam, taking care to match colors. Fold down ribbing and sew hanging loop in place.
Weave in ends.
Abbreviations
- A, B, C
- Color A, Color B, Color C, etc.
- ch
- chain(s)
- dc
- double crochet
- hdc
- half double crochet
- sc
- single crochet
- st(s)
- stitch(es)
- ( )
- work directions in parentheses into same st
- [ ]
- work directions in brackets the number of times specified
- *
- repeat whatever follows the * as indicated
Read NextYummy Gingerbread Crochet Stockings
Your Recently Viewed Projects
Thanks for your comment. Don't forget to share!
SissieSass
Sep 28, 2018
How do stockings get any cuter than these? I mean, gingerbread men are so cute. I know I would want some homemade goodies in my stocking if it were me. I would want someone to put some gingerbread goodness in my stocking for sure. I can think of so many people that would love a cookie stocking.
lcarr
Sep 28, 2017
I have been thinking about making Christmas stockings for quite some time now. This pattern is not only cute, it looks like it would be quick to make and easy to follow. The gingerbread couple are adorable, and I really like the striped cuff on the top of the stocking.
Report Inappropriate Comment
Are you sure you would like to report this comment? It will be flagged for our moderators to take action.
Thank you for taking the time to improve the content on our site.