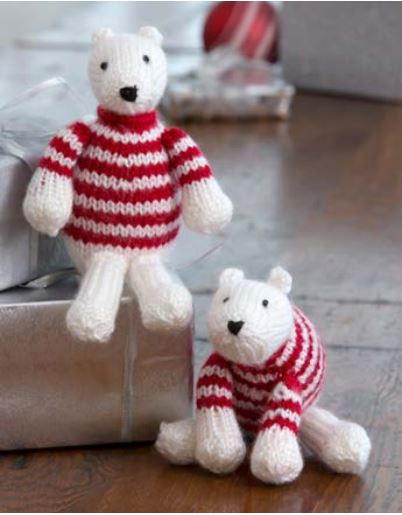
Precious Polar Bear DIY Ornaments

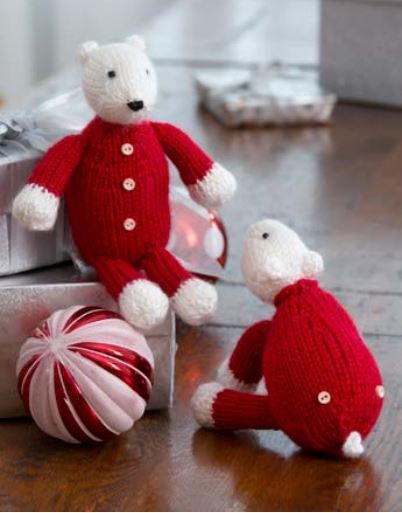
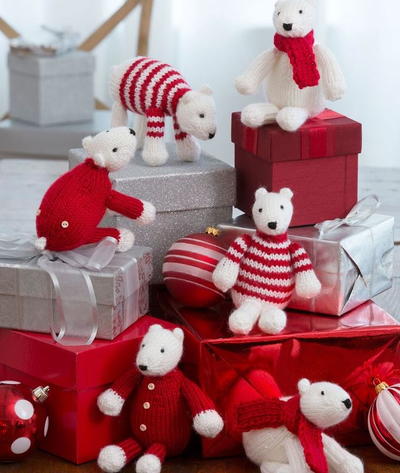
The only things that could make polar bear ornaments more adorable would be to put them in sweaters and scarves. That's why these Precious Polar Bear DIY Ornaments are just the cutest DIY ornaments ever. These knitting patterns provide you with several polar bear styles to knit. Use these little guys as ornaments or set them up on the mantel or table to help celebrate the holiday season. Any kid would also love one of these polar bear crafts to carry around, too. No matter how you want to use these decorations, you'll want to knit them right away.
This project is featured in 12 Polar Bear Crafts from FaveCrafts.
Estimated Cost$11-$20
Time to CompleteIn an evening
MaterialsYarn

Materials List
- 1 ball each of RED HEART Soft: A 4600 White and B 9925 Really Red
- Susan Bates brand Double-Pointed Knitting Needles: 3.5mm [US 4]
- Susan Bates brand Knitting Needles: 4.00mm [US 6]
- Stitch markers
- Yarn needle
- 2 – 1/4" (6 mm) black beads (2 beads for eyes per bear)
- 2-5 – 1/4" (6 mm) white buttons (3 buttons for front, and 2 buttons on back for long underwear version)
- Sewing needle and black thread
- Embroidery needle and black floss
- Straight pins
- Polyester fiberfill
Special Stitches and Stitch Patterns:
Special Stitches
KFB = Knit 1 stitch in the front, then in the back. Increase is made.
SSK = Slip, slip, knit slipped stitches together. Decrease is made. K2tog = Knit 2 sts together.
Stitch Patterns
K1 x P1 Rib
Row 1= *K1, P 1* across Row.
Next Row = Knit the knit sts, Purl the purl sts for K1 x P1 Rib pattern.
Directions for Head:
Using A and smaller needles, cast on 6 stitches, place marker, (place 2 sts on each of 3 needles).
Join, being careful not to twist sts.
-
*Kfb in next st; repeat from * around – 12 sts.
-
Knit around.
-
*K1, kfb in next st; repeat from * around – 18 sts.
-
Knit around.
-
*K2, kfb in next st; repeat from * around – 24 sts.
-
Knit around.
-
*K3, kfb in next st; repeat from * around – 30 sts.
-
Knit around.
-
Knit around.
-
Knit around.
-
Knit around.
-
K2, ssk, k6, k2tog, k6, ssk, k6, k2tog, k2 – 26 sts.
-
K2, ssk, k4, k2tog, k6, ssk, k4, k2tog, k2 – 22 sts.
-
K2, ssk, k2, k2tog, k6, ssk, k2, k2tog, k2 –18 sts. Stuff as rounds are completed.
-
K2, ssk, k2tog, k6, ssk, k2tog, k2 –14 sts
-
Knit around.
-
Knit around.
-
Knit around.
-
*K2, k2tog* 3 times, k2 –11 sts.
Stuff head firmly. Finish off by weaving yarn end through remaining live sts, pulling tightly to close opening, knot to secure. Leave yarn ends for attaching head to body.
Directions for Ears:
Make 2 per bear.
Using A and smaller size needles, cast on 5 stitches.
-
Knit. Weave yarn end through live sts and pull tightly to close. Knot to secure. Leave yarn ends for attaching ears to head.
-
Knit. Weave yarn end through live sts and pull tightly to close. Knot to secure. Leave yarn ends for attaching ears to head.
Directions for Tail:
Make 1 per bear.
Using A and smaller size needles, cast on 5 stitches.
-
Knit. Weave yarn end through live sts and pull tightly to close. Knot to secure. Leave yarn ends for attaching tail to body.
Directions for Basic Body:
Using A and smaller size needles, cast on 18 stitches, place marker, (place 6 sts on each of 3 needles).
Join, being careful not to twist sts.
-
Knit around.
-
Knit around.
-
Knit around.
-
*K2, kfb; repeat from * around – 24 sts.
-
Knit around.
-
Knit around.
-
Knit around.
-
*K3, kfb; repeat from * around – 30 sts.
-
Knit around.
-
Knit around.
-
Knit around.
-
*K4, kfb; repeat from * around – 36 sts.
-
Knit around.
-
Knit around.
-
Knit around.
-
Knit around.
-
Knit around.
-
Knit around.
-
Knit around.
-
Knit around.
-
Knit around.
-
Knit around.
-
Knit around.
-
Knit around.
-
Knit around.
-
Knit around.
-
Knit around.
-
*K4, k2tog; repeat from * around – 30 sts.
-
Knit around.
-
*K3, k2tog; repeat from * around – 24 sts.
-
Knit around.
-
*K2, k2tog; repeat from * around – 18 sts.
-
Knit around.
-
*K1, k2tog; repeat from * around – 12 sts.
-
*K1, k2tog; repeat from * around – 8 sts.
Stuff body firmly. Finish off by weaving yarn end through live sts and pulling tightly to close, knot to secure. Leave yarn end from cast on edge for attaching head to body.
Directions for Body Variations - Striped Sweater Body:
Using B and smaller size needles, cast on 18 stitches, place marker, (place 6 sts on each of 3 needles).
Join, being careful not to twist sts.
-
Knit around.
-
Knit around.
-
Using A, knit around for 2 rounds. Do not cut B, carry non-working yarn (B), loosely along back unless otherwise directed.
-
Using A, knit around for 2 rounds. Do not cut B, carry non-working yarn (B), loosely along back unless otherwise directed.
-
FOR ROUNDS 5-22: Working in stripe pattern of 2 rounds per color – B, A, B, A, follow the directions for the basic body, finishing off with B at end of round 22.
-
FOR ROUNDS 23-35: Continue rounds as for basic body, using A only. Stuff firmly, finish off as per basic body.
Directions for Body Variations - Long Underwear Body:
Using B and smaller size needles, cast on 18 stitches, place marker, (place 6 sts on each of 3 needles).
Join, being careful not to twist sts. Follow rounds 1-35 for basic body. Stuff and finish off as directed above. Add long underwear details by sewing 3 - 1/4" (6 mm) buttons down the front and 2 buttons on either side of tail to simulate the back flap.
Directions for Body Variations - Basic Legs:
Make 4 per bear.
Using A and smaller size needles, cast on 10 stitches, place marker, (place 3-3-4 sts on each of 3 needles).
Join, being careful not to twist sts.
-
FOR ROUNDS 1-15: Knit around.
-
FOR ROUND 16: *K1, kfb; repeat from * around – 15 sts.
-
FOR ROUND 17: *K2, kfb; repeat from * around – 20 sts.
-
FOR ROUND 18: K around. Stuff Leg as rounds are completed.
-
FOR ROUND 19: *K2, k2tog; repeat from * around –15 sts.
-
FOR ROUND 20: *K1, k2tog; repeat from * around – 10 sts. Complete stuffing leg. Finish off by weaving yarn end through live sts and pulling tightly to close, knot to secure. Leave yarn ends from cast on edge for attaching legs to body.
Directions for Leg Variations - Striped Sweater Leg Variation:
Make striped version for only 2 of the 4 legs (the lower legs are worked in solid A). Using B and smaller size needles, cast on 10 sts, place marker, (place 3-3-4 sts on each of 3 needles).
Join, being careful not to twist sts.
-
Using B, knit around.
-
FOR ROUNDS 2-3: Using A, knit around.
-
FOR ROUNDS 4-9: Continue working in stripe pattern of 2 rounds per color finishing off with B at end of round 9.
-
FOR ROUNDS 10-20: Using A, complete rounds as for basic legs. Finish off as directed, repeat for second leg. Work lower 2 legs in solid A.
Directions for Leg Variations - Long Underwear Leg Variation:
Using B and smaller size needles, cast on 10 stitches, place marker, (place 3-3-4 sts on each of 3 needles).
Join, being careful not to twist sts.
-
FOR ROUNDS 1-12: Knit around finishing off with B at end of round 12.
-
FOR ROUNDS 13-20: Using A, complete rounds13-20 as for basic legs. Finish off as per basic legs, repeat for remaining legs.
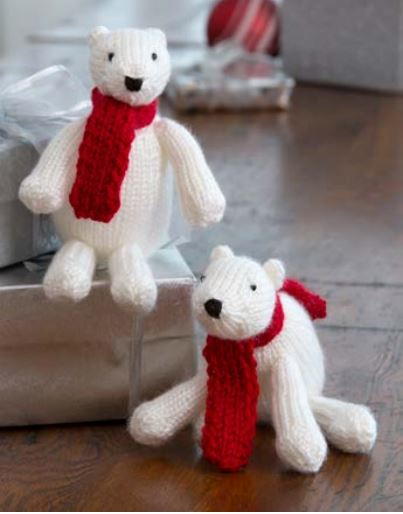
Directions for Scarf:
Using B and larger size needles, cast on 8 stitches.
Do not join, work back and forth in rows.
-
K1, P1 across row.
-
FOR NEXT ROWS: Continue working in K1 x P1 rib until piece measures approximately 9" (23 cm) from cast on edge. Bind off all sts, trim and weave in ends.
Directions for Finishing:
Refer to photo for placement of facial features, head and leg positions. Using black thread, sewing needle and 2 black beads, sew beads to front of head for eyes, using the beginning of the decrease rounds to mark the eye placement. Using black floss and embroidery needle, embroider nose in a triangle shape at the small tip of the head.
Note: Do not separate strands of floss, use as one single strand. Position and pin the ears to the back sides of the head. Attach ears by sewing securely to head using yarn tail. Knot, weave in ends and trim yarn end. Position and pin the tail in the middle of the lower back of the body. Attach tail by sewing securely to back of body using yarn tail. Knot, weave in ends and trim yarn end.
-
Finishing for Seated Bear: Using yarn ends, attach head paying close attention to the positioning of the head. Set body portion on end with the fat portion sitting on the table and the neck opening upwards towards the ceiling. Attach the head by placing the fatter portion of the stuffed head on top of the neck opening, (teddy bear style), with the nose pointing outward, (parallel to the table), making certain that the front of the body and the front of the head are consistent. Sew securely with yarn end, weaving and trimming ends. Using yarn ends attach the arms (legs) to sides of the top portion of the body, about 4-5 rounds from the neck opening. Weave and trim excess yarn. Using yarn ends, attach bottom legs to front lower portion of body, making certain the legs are situated correctly as to allow the bear to sit teddy bear style.
-
Finishing for Standing Bear: Using yarn ends, attach the head paying close attention to the positioning of the head. Lay the stuffed body on its side, on the table. Position the head with the cast on round in the middle of the neck opening, (and the nose pointing straight ahead, in same direction of the body). Head and body should lie in a straight line. Attach using yarn end, trimming excess yarn. Sew legs to the underside of the body so that the bear can stand on all fours.
Tip: Pin or baste legs in position so changes can easily be made before committing to finished stitching. If using a scarf, loop around the neck and tie once in front.
Abbreviations
- A, B
- color A, Color B
- cm
- centimeters
- K
- knit
- mm
- millimeters
- P
- purl
- st(s)
- stitch(es)
- St st
- stockinette stitch
- tog
- together
- []
- work directions in brackets the number of times specified
- * or **
- repeat whatever follows the * or ** as indicated
NotesNotes:
GAUGE: 20 sts = 4” (10 cm); 32 rows = 4” (10 cm) in.
Stockinette stitch on size 3.5mm [US 4] needles.
CHECK YOUR GAUGE.
Use any size needles to obtain the gauge.
Bears Measure: Standing version: 5” (13 cm)tall.
Seated version: 6” (15 cm) tall.
-Pattern makes 6 different versions of bears using simple color patterns and either seated or standing positioning of body parts when sewing together.
-All versions are worked in the round on smaller size needles. Stuffing is added as rounds are completed. Body parts are made separately, then sewn together using yarn ends.
-Facial features are made by using either small or medium size beads for eyes and floss for embroidered nose. Use photo as a guide for placement.
Read NextMerry Star and Ball Knit Ornaments
Your Recently Viewed Projects
Thanks for your comment. Don't forget to share!
Sigo
Nov 23, 2017
These knitted bears are so sweet! I would love to give this project a try one day! Thank you for the pattens!
mulberrygalprinces s
Sep 20, 2017
These little darlings will be peeking out of some peoples stockings this Christmas. The patterns are very easy to follow, and very well written. I think putting one on a large candy cane or on a candy bar. They can also be used to decorate presents. Or hung in the tree. Thank you!
writerlady
Jun 07, 2016
#BestIdeaEver These polar bears are the cutest! I can't wait to start knitting them for my grandchildren. They will have adorable little toys to play with all winter. Polar bears don't have to be put away at Christmas )
Editor for AllFree CrochetAfghanPatte rns
Jun 06, 2016
These are the cutest ever! They would make awesome gift toppers for your favorite friends.
Report Inappropriate Comment
Are you sure you would like to report this comment? It will be flagged for our moderators to take action.
Thank you for taking the time to improve the content on our site.