Christmas Joy DIY Quilt

Fill your heart with joy this Christmas and stay warm while you're at it. This Christmas Joy DIY Quilt is a must-make for the winter. This quilt tutorial is easy enough for beginners and makes one of the most unique and thoughtful homemade Christmas gifts, too. So, if you're looking for Christmas gift ideas for mom or anyone else, you know what to do. Get quilting ahead of time to make one of the nicest free quilt patterns for the holidays. She'll love the floral and bird images combined with the cross quilt pattern.
Time to CompleteWeekend project
MaterialsFabric

Materials List
- 1/3 yard (.31m) of Red x Joy Joy - Chickadee (PWAC017.0REDX)
- 1-1/4 yards (1.1m) of Antique x Joy Joy - Merry (PWAC018.0ANTI)
- 7/8 yard (.80m) of Red x Joy Joy - Merry (PWAC018.0REDX)
- 1-1/4 yards (1.1m) of Ecru x Joy Joy - Holly (PWAC019.0ECRU)
- 1-1/3 yards (1.3m) including binding of Red x Joy Joy - Holly (PWAC019.0REDX)
- 2/3 yard (.61m) of Red x Joy Joy - Heritage (PWAC021.0REDX)
-
3-5/8 yards (3.32m) for non-directional backing*, 4-1/8 yards (3.77m) if directional backing is substituted x Joy Joy - Dec Stripe ( PWAC020.0ECRU) *4-1/8 yards (3.77m) if directional backing is substituted.
- Additional Requirements: Sewing machine, 62" x 71" (158cm x 180cm) quilt batting, Coats All Purpose Threads, rotary cutter, ruler, and mat, basic sewing and pressing supplies
Cutting Directions:
WOF = Width of Fabric, LOF = Length of Fabric
-
Fabric A (chickadee print), cut: (1) 3-7/8" (9.84cm) x WOF; subcut (10) 3-7/8" x 3-7/8" (9.84cm x 9.84cm) (1) 3-1/2" (8.89cm) x WOF; subcut (5) 3-1/2" x 3-1/2" (8.89cm x 8.89cm)
-
Fabric B (cream floral), cut: (6) 3-7/8" (9.84cm) x WOF; subcut (60) 3-7/8" x 3-7/8" (9.84cm x 9.84cm) (3) 3-1/2" (8.89cm) x WOF, for outer top and bottom border
-
Fabric C (red floral), cut: (4) 3-7/8" (9.84cm) x WOF; subcut (40) 3-7/8" x 3-7/8" (9.84cm x 9.84cm) (1) 3-1/2” (8.89cm) x WOF; subcut (5) 3-1/2" x 3-1/2" (8.89cm x 8.89cm) (3) 2" (5.08cm) x WOF, for inner side border
-
Fabric D (cream holly), cut: (6) 3-7/8" (9.84cm) x WOF; subcut (60) 3-7/8" x 3-7/8" (9.84cm x 9.84cm) (3) 3-1/2" (8.89cm) x WOF, for outer side border
-
Fabric E (red holly), cut: (4) 3-7/8" (9.84cm) x WOF; subcut (40) 3-7/8" x 3-7/8" (9.84cm x 9.84cm) (1) 3-1/2" (8.89cm) x WOF; subcut (5) 3-1/2" x 3-1/2" (8.89cm x 8.89cm) ?(7) 2-1/2" (6.35cm) x WOF, for binding (3) 2" (5.08cm) x WOF, for inner top and bottom border
-
Fabric F (triangles), cut: (3) 3-7/8” (9.84cm) x WOF; subcut (30) 3-7/8" x 3-7/8" (9.84cm x 9.84cm) (2) 3-1/2" (8.89cm) x WOF; subcut (15) 3-1/2" x 3-1/2" (8.89cm x 8.89cm)
Sewing Directions:
Note: Use a 1/4" (.64cm) seam allowance throughout. Sew all pieces with right sides together and raw edges even using matching thread. Press seams toward the darker fabrics.
-
STEPS 1-3 FOR BLOCK ASSEMBLY:
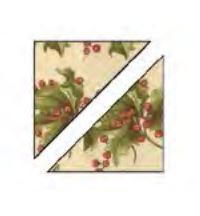
Place the 3-7/8" (9.84cm) Fabric A squares right side up. Cut (5) squares diagonally in half from upper left to lower right and the other (5) diagonally in half from upper right to lower left. Cut all the remaining B through F 3-7/8" (9.84cm) squares diagonally in half once in any direction. -
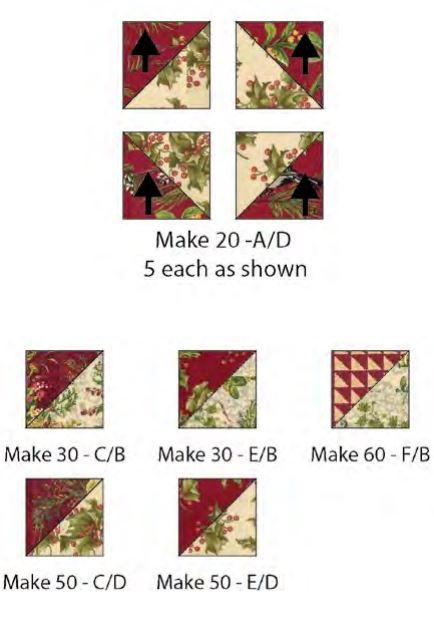
Stitch the half-square triangles together in pairs along the diagonal edge to make the designated number of triangle sets.
-
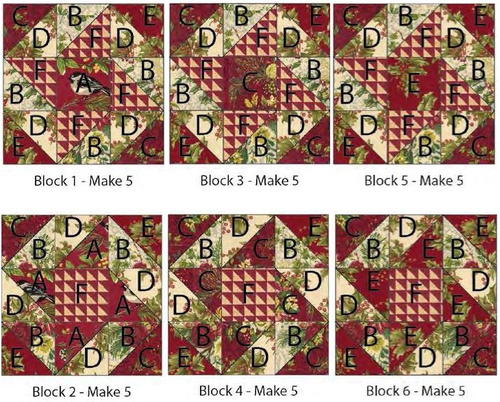
Arrange 3-1/2" (8.89cm) squares and triangle sets in three horizontal rows as shown for each block. Make sure all Fabric A triangle sets and squares are oriented correctly. Sew into rows and then sew the rows together. Make 5 of each 9-1/2" x 9-1/2" (24.13cm x 24.13cm) block.
-
STEPS 4-11 FOR QUILT TOP ASSEMBLY:
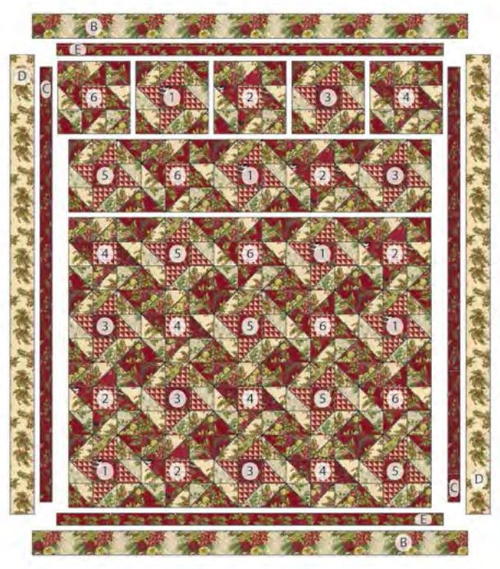
Noting Quilt Layout for block placement and orientation, arrange the blocks into (6) horizontal rows of (5) blocks each. Sew the blocks into rows, and then sew the rows together to complete the 45-1/2" x 54-1/2" (115.57cm x 138.43cm) quilt center. -
Inner border. Carefully matching the design, sew (3) 2" (5.08cm) x WOF Fabric C strips together end to end. Cut into two equal length borders. Sew borders to right and left sides of quilt top. Press and trim excess. Again matching the design, stitch (3) 2" (5.08cm) x WOF Fabric E strips together end to end. Cut into two equal length borders. Sew borders to top and bottom of quilt top. Press and trim excess. The quilt top should measure 48-1/2" x 57-1/2" (123.19cm x 146.05cm).
-
Outer border. Carefully matching the design, stitch (3) 3-1/2" (8.89cm) x WOF Fabric D strips together end to end. Cut into two equal length borders. Sew borders to right and left sides of quilt top. Press and trim excess. Again matching the design, stitch (3) 3-1/2" (8.89cm) x WOF Fabric B strips together end to end. Cut into two equal length borders. Sew borders to top and bottom of quilt top. Press and trim excess. The quilt top should measure 54-1/2" x 63-1/2" (138.43cm x 161.29cm).
-
Cut and piece the backing to measure 62" x 71" (158cm x 180cm). Layer the backing right side down, batting, and quilt top right side up. Quilt or tie as desired.
-
Prepare binding from (7) 2-1/2" x WOF (6.35cm x WOF) Fabric E strips. Sew strips short ends together into one long binding strip and press seams open. Press strip in half lengthwise with wrong sides together.
-
Carefully trim backing and batting even with quilt top.
-
Leaving an 8" (20.32cm) tail of binding, sew binding to top of quilt through all layers matching all raw edges. Miter corners. Stop approximately 12" (30.48cm) from where you started. Lay both loose ends of binding flat along quilt edge. Where these two loose ends meet, fold them back on themselves and press to form a crease. Using this crease as your stitching line, sew the two open ends of the binding together right sides together. Trim seam to 1/4" (.64cm) and press open. Finish sewing binding to quilt.
-
Turn binding to back of quilt and blind stitch in place.
Read NextDIY Christmas Potpourri In A Jar