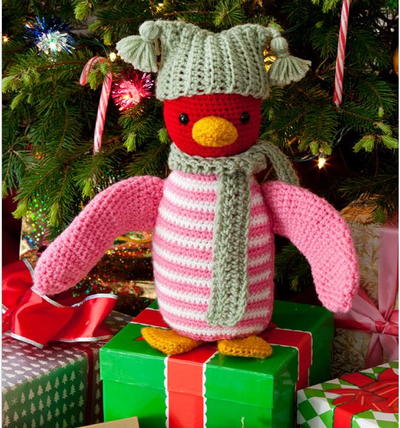
Huggable Penguin Crochet Pattern

Check out this Huggable Penguin Crochet Pattern that would be perfect for Christmastime! This crochet toy is just waiting to be loved by somebody. It's waddling towards you with open arms. This adorable crochet penguin craft is one of the most perfect homemade Christmas gifts for children or anyone who loves anything cute. If you already know how to crochet, then you'll find this free printable pattern easy to follow. Start making this DIY toy today so that you'll have it to give on Christmas Day!
Estimated Cost$11-$20
Time to CompleteWeekend project
Main MaterialYarn

Materials:
- Red Heart® Super Saver®: 1 skein each of 319 Cherry Red A, 706 Perfect Pink B, 316 Soft White C, 321 Gold D, 661 Frosty Green E.
- Crochet hooks: 4.25 mm [US G-6] and 5.5 mm [US I-9] (for scarf and hat only)
- Yarn needle
- Stuffing
- Stitch marker
- One pair 9-12 mm safety eyes
- 3 x 4" piece of heavy cardboard (for making hat tassels)
- Pins
Notes:
GAUGE: 18 sts = 4"; 20 rows = 4" in single crochet with smaller hook. CHECK YOUR GAUGE. Use any size hook to obtain the gauge.
Special Technique: Adjustable ring: Holding the yarn a few inches from the end, wrap around your finger. Do not remove wrap from finger, insert hook into the wrap and draw up a loop of working yarn. Chain one to secure the loop, and remove ring from finger. Work stitches of first round in the ring. Pull gently, but firmly, on tail to tighten ring.
Special Stitches:
hdc2tog = [Yarn over, draw up a loop in next st] twice, yarn over and draw through all 5 loops on hook.
sc2tog = [Draw up a loop in next st] twice, yarn over and draw through all 3 loops on hook.
Tips:
- Gauge is not critical for this project. Work tightly so stuffing will not show between stitches.
- Pieces are worked separately then sewn together.
- Most pieces are worked in continuous rounds, do not join at ends of rounds unless instructed.
- Head and body are worked in one piece.
- Chest piece is worked in 2-row stripes. To change color, work last stitch of old color to last yarn over. Yarn over with new color and draw through all loops on hook to complete stitch. Proceed with new color. Carry color not in use up side of piece. Take care to cover carried strands when working edging.
- Hat is worked flat in ribbing and then seamed.
- Hat and scarf are removable. Do not sew to penguin, unless desired.
Instructions:
HEAD AND BODY:
Beginning at top of head, with smaller hook and A, make an adjustable ring.
Round 1: Work 6 sc in ring—6 sc. Do not join, work in continuous rounds (spirals). Place a marker for beginning of round. Move marker up as each round is completed.
Round 2: Work 2 sc in each sc around—12 sc.
Round 3: [2 sc in next sc, sc in next sc] 6 times—18 sc.
Round 4: [2 sc in next sc, sc in next 2 sc] 6 times—24 sc.
Round 5: [2 sc in next sc, sc in next 3 sc] 6 times—30 sc.
Round 6: [2 sc in next sc, sc in next 4 sc] 6 times—36 sc.
Round 7: [2 sc in next sc, sc in next 5 sc] 6 times—42 sc.
Round 8: [2 sc in next sc, sc in next 6 sc] 6 times—48 sc.
Rounds 9–20: Sc in each sc around.
Round 21: [Sc in next 6 sc, sc2tog] 6 times—42 sts.
Round 22: [Sc in next 5 sts, sc2tog] 6 times—36 sts.
Round 23: [Sc in next 4 sts, sc2tog] 6 times—30 sts.
Round 24: [Sc in next 3 sts, sc2tog] 6 times—24 sts.
Round 25: Sc in each sc around. Attach safety eyes between Rounds 16 and 17.
Rounds 26–28: Repeat Rounds 5–7—42 sc.
Rounds 29–31: Sc in each sc around.
Round 32: Repeat Round 8—48 sc.
Round 33: Sc in each sc around.
Round 34: [2 sc in next sc, sc in next 7 sc] 6 times—54 sc.
Round 35: Sc in each sc around.
Round 36: [2 sc in next sc, sc in next 8 sc] 6 times—60 sc.
Rounds 37–57: Sc in each sc around. Begin stuffing piece, and continue to stuff until piece is complete.
Round 58: [Sc in next 8 sc, sc2tog] 6 times—54 sts.
Round 59: [Sc in next 7 sts, sc2tog] 6 times—48 sts.
Rounds 60–63: Repeat Rounds 21–24—24 sts.
Round 64: [Sc in next 2 sts, sc2tog] 6 times—18 sts.
Round 65: [Sc in next st, sc2tog] 6 times—12 sts. Fasten off, leaving a long tail. Thread tail through stitches of last round. Pull to close opening. Securely weave in end.
CHEST PIECE:
With smaller hook and C, ch 14.
Row 1: Working in back bumps only, sc in 2nd ch from hook and in each ch across; change to B, turn—13 sc.
Row 2: With B, ch 1, [2 sc in next sc, sc in next 3 sc] 3 times, sc in last sc, turn—16 sc.
Row 3: With B, ch 1, [sc in next 3 sc, 2 sc in next sc] 4 times; change to C, turn—20 sc.
Row 4: With C, ch 1, [sc in next 4 sc, 2 sc in next sc] 4 times, turn—24 sc.
Row 5: With C, ch 1, sc in each sc across; change to B, turn.
Rows 6–17: Ch 1, sc in each sc across and continue to change color every other row, turn.
Row 18: With B, ch 1, [sc in next 5 sc, 2 sc in next sc] 4 times, turn—28 sc.
Row 19: With B, ch 1, sc in each sc across; change to C, turn.
Rows 20–37: Ch 1, sc in each sc across and continue to change color every other row, turn.
Row 38: With B, ch 1, [sc2tog] 2 times, sc in next 20 sc, [sc2tog] 2 times—24 sc.
Edging: With B, ch 1, sc evenly spaced around edges of entire piece; join with slip st in first sc. Fasten off, leaving a long tail for sewing to body.
FLIPPERS (make 2):
With smaller hook and B, ch 20; join with slip st in first ch to form a ring, taking care not to twist ch.
Round 1: Ch 1, sc in each ch around—20 sts. Do not join, work in continuous rounds (spirals). Place a marker for beginning of round. Move marker up as each round is completed.
Rounds 2–15: Hdc in next 10 sts, sc in last 10 sts.
Round 16: Sc in next 10 sts, hdc in last 10 sts.
Rounds 17–19: Hdc in each st around.
Round 20: [Hdc in next 3 hdc, hdc2tog] 4 times—16 hdc.
Round 21: [Hdc in next 2 hdc, hdc2tog] 4 times—12 hdc.
Round 22: [Hdc in next hdc, hdc2tog] 4 times—8 hdc.
Round 23: [Hdc2tog] 4 times—4 hdc.
Fasten off, leaving a long tail. Do not stuff flipper. Thread tail through stitches of last round. Pull to close opening. Securely weave in end.
BEAK:
With smaller hook and D, ch 17; join with slip st in first ch to form a ring, taking care not to twist ch.
Round 1: Ch 1, sc in each ch around—17 sc. Do not join, work in continuous rounds (spirals). Place a marker for beginning of round. Move marker up as each round is completed.
Round 2: Sc in each sc around.
Round 3: Sc in next sc, [sc in next 2 sc, sc2tog] 4 times—13 sts.
Round 4: Sc in next sc, [sc in next sc, sc2tog] 4 times—9 sts
Round 5: Sc in each sc around.
Fasten off, leaving a long tail. Thread tail through stitches of last round. Pull to close opening. Securely weave in end. Stuff beak lightly.
FEET (make 2):
With smaller hook and D, ch 11.
Round 1: Sc in 2nd ch from hook and in each ch across to last ch, 2 sc in last ch; working across opposite side of foundation ch, sc in next sc and in each sc across; join with slip st in first sc—20 sc.
Rounds 2–5: Sc in each sc around.
Round 6: [Sc in next 3 sc, sc2tog] 4 times—16 sc.
Rounds 7–11: Sc in each sc around.
Round 12: [Sc in next 2 sc, sc2tog] 4 times—12 sc.
Round 13: [Sc in next sc, sc2tog] 4 times—8 sc.
Fasten off, leaving a long tail for sewing. Do not stuff feet.
SCARF:
With larger hook and E, ch 62.
Row 1: Working in back bumps only, hdc in 3rd ch from hook and in each ch across, turn—60 sts.
Row 2: Ch 3, dc in each st across, turn.
Row 3: Ch 2, hdc in each st across.
Fasten off. Weave in tail.
HAT:
With larger hook and E, ch 12.
Row 1: Sc in 2nd ch from hook and in each ch across, turn—11 sc.
Rows 2–31: Ch 1, working in front loops only, sc in each sc across, turn. Fasten off, leaving a long tail for sewing. With tail, sew short edges together to form a tube. Flatten the piece, and working through both thicknesses, slip st across top edge to seam crown of hat.
TASSELS (make 2):
Wrap yarn around piece of heavy cardboard about 25 times. Thread a 12" strand of yarn under the top of the wraps and tie a knot to secure. Slip wraps from cardboard. Wrap a 10" strand of yarn around the wraps several times, about 1/2" below the top tie for tassel neck. Tie ends of strand to secure and thread ends to inside of tassel. Cut ends of wraps, trim to desired length. With ends of top tie, tie one tassel to each top corner of hat. Knot the ties securely on the inside of hat.
FINISHING:
Sew flippers to side edges near top of chest piece. Pin chest piece to body and sew in place. Sew beak to face, centered between eyes. Sew feet to bottom of penguin. Weave in any remaining ends. Tie scarf around neck and place hat on head.
ABBREVIATIONS: A, B, C, D, and E = Color A, B, C, D, and E; ch = chain; dc = double crochet; hdc = half double crochet; sc = single crochet; st(s) = stitch (es); [] = work directions in brackets the number of times specified.
Find this great pattern and more in 27 Free Christmas Crochet Patterns for Summer.
Read NextTop Down Crochet Top – Free Pattern
Your Recently Viewed Projects
Thanks for your comment. Don't forget to share!
SissieSass
Oct 31, 2018
My daughter will go bananas for this crochet penguin. What is a stitch marker? I have never heard of one or used it before now? I want to make this penguin for my daughter this year because she is at the dorm, and I know she will snuggle with it all the time.
Zeemer
Aug 24, 2016
Five rating for the effort. This huggable crochet penguin can be a welcome fixture under the Christmas tree. The kids will surely like it. Thanks for this free pattern which is clearly written and available right on this same page.
Report Inappropriate Comment
Are you sure you would like to report this comment? It will be flagged for our moderators to take action.
Thank you for taking the time to improve the content on our site.