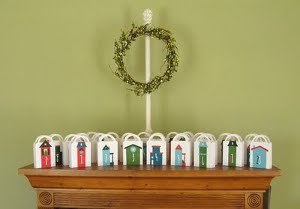
Sheet Music Boxes Advent Calendar
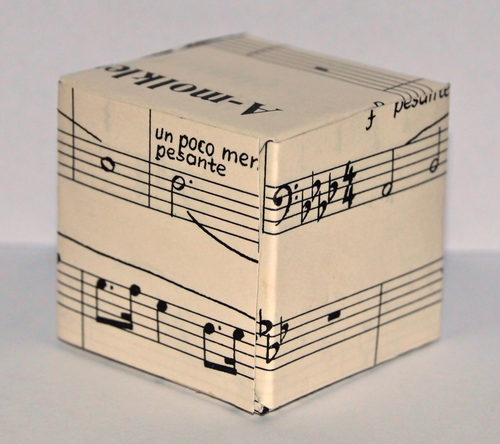
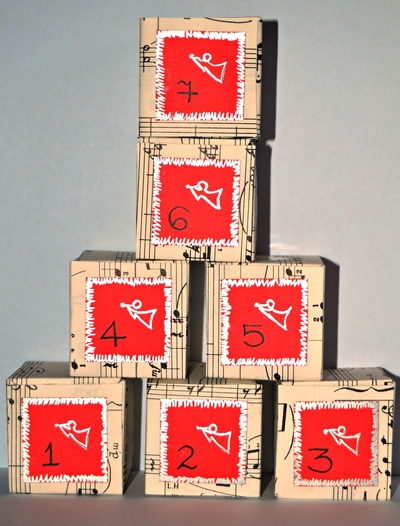
This DIY advent calendar is a great thrifty use for old sheet music!

If you're looking for homemade advent calendar ideas, try the Sheet Music Boxes Advent Calendar. Use an advent calendar template to make this easy project. This is a great thrifty project that looks so lovely when completed!
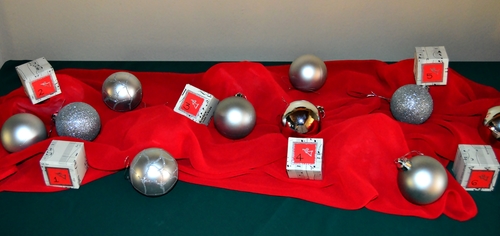
From the Designer: "Turn music sheets into small numbered boxes to add a vintage touch to your advent calendar. Display the boxes on a mantelpiece, along with baubles and any other decorations of choice, and create a fun way to let the kids count down the days in anticipation of Christmas morning."
Estimated CostUnder $10
Time to CompleteIn an evening
MaterialsPaper, Recycled Materials
Primary TechniquePaper Crafts

HolidayChristmas
Project TypeMake a Project
Materials List
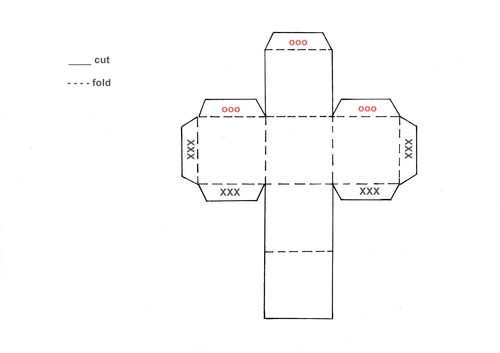
- 24 copies of the provided pattern for the box
- 12 A4 sized music sheets (you should be able to cut two boxes from each music sheet)
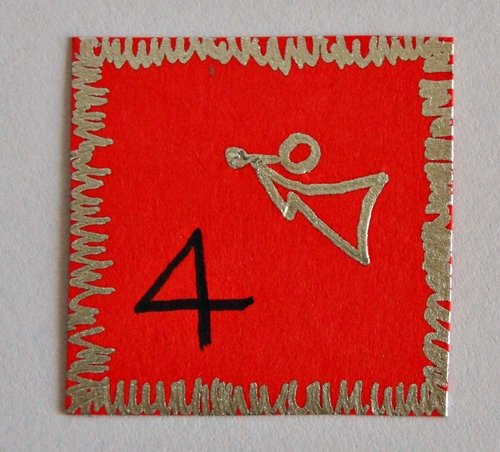
- 24 pieces of red cardstock, each sized 1.2” x 1.2”
- 24 small chocolates
- Faber Castell 0.7mm black ecco pigment pen
- Pilot silver marker pen
- Quick-drying craft glue (such as Bostik Clear)
- 0.4” long angel embossing tool
- Standard scissors
- Ruler
Instructions
-
With the pattern facing upwards, glue the printout of the pattern sheet on to the music sheet.
-
Cut out the box, following the ___ cutting lines of the pattern.
-
With the pattern facing upwards, use the ruler to fold all the - - - lines towards you.
-
Add glue to the flaps marked with xxx and glue the bottom of the box together.
-
Pop the small chocolate into the box, before gluing the lid in place ~ see parts marked 000.
-
Emboss an angel to the top right corner of a red cardstock square. Highlight the angel with the silver pen and add a stitch pattern around the cardstock. Allow to dry thoroughly.
-
Use the black pen to add the number 1 to the bottom left corner of the red square.
-
Repeat steps 1-6 to make the other 23 boxes. When numbering them, number them in sequence from 2-24.
-
Display the completed boxes on a mantelpiece and let the countdown begin!