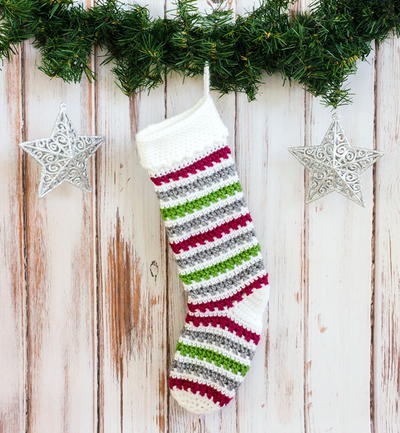
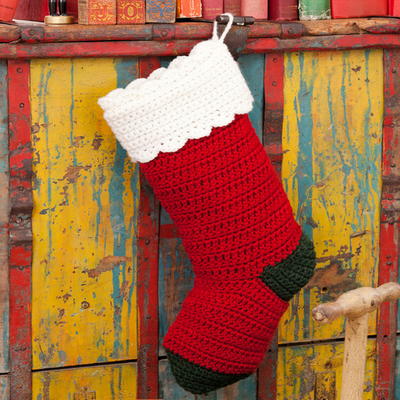
Yuletide Cheer DIY Stocking

This Yuletide Cheer DIY Stocking is one of the most perfectly classic Christmas stockings you will ever see. That's great for many reasons including that it means that this is one of the easiest crochet patterns you will find for your DIY Christmas stockings, too. This Christmas stocking pattern is so simple because it has a basic stitch and classic colors of red for the base, green for the heel and toe, and white for the cuff. Three Christmas colors combined to make a beautiful Christmas stocking pattern you'll enjoy hung up on your fireplace.

Crochet HookG/6 or 4 mm hook, H/8 or 5 mm hook
Yarn Weight(4) Medium Weight/Worsted Weight and Aran (16-20 stitches to 4 inches)
Crochet Gauge14 sts = 4; 10 rows = 4 in pattern with larger hook
Finished SizeStocking measures 16 long.
Materials List
- RED HEART® Super Saver®: 1 skein each: 332 Ranch Red A, 633 Dark Sage B, and 316 Soft White C
- Susan Bates brand crochet hook: 5mm [US H-8]
- Yarn needle
Instructions:
Special Abbreviation
Sc2tog = [draw up a loop in next st] twice, yo and draw through all 3 loops on hook.
Stocking
With larger hook and A, ch 43.
Row 1 (Right Side): Sc in 2nd ch from hook and in each ch across; turn 42 sc.
Row 2: Ch 3 (counts as dc), skip first sc, dc in next sc and in each sc across; turn.
Row 3: Ch 1, sc in each dc across, sc in top of ch-3; turn. Repeat Rows 2 and 3 for pattern until 10 from beginning, end by working Row 2. Fasten off.
Heel
With right side facing and larger hook, skip first 32 sts of last row, join B in next st; ch 1, sc in same st and in next 9 sts, bring other side of stocking around and sc in first 11 sts; turn 21 sts.
Shape Heel
Work short rows as follows:
Next Row: Ch 1, sc in first 14 sc; turn.
Next Row: Ch 1, sc in first 7 sc; turn.
Next Row: Ch 1, sc in first 7 sc, sc in next st of long row below; turn. 8 sc.
Next Row: Ch 1, sc in first 8 sc, sc in next st of long row below; turn 9 sc. Continue in this manner until all 21 heel sts are worked. Fasten off.
Foot
With right side facing and larger hook, skip first 10 sc of heel, join A in next sc; ch 1, sc in same sc and in next 10 sc of heel, skip next 2 sts of stocking, sc in next 17 sts of stocking, skip next 2 sts, sc in next 10 sts of heel; turn 38 sc.
Repeat pattern Rows 2 and 3 five more times, then Row 2 once more. Fasten off.
Toe
With right side facing and larger hook, join B in first st of foot; ** ch 1, sc2tog, sc in next 15 dc, sc2tog, turn 17 sc. Continue in sc only and decrease 1 st each end of every row until 3 sts remain. Fasten off. ** With right side facing, join B in next st of last long row. Work same as first half of toe from ** to **.
FINISHING
Sew toe, foot and back seams. Sew openings closed at corners of heel.
Cuff
With larger hook and C, ch 47. Work 11 rows of sc over 46 sts. Fasten off. Sew cuff seam.
Lower Cuff Edging
*** With right side facing and smaller hook, join C at back seam; ch 1, sc in first 2 sc, * skip next sc, (dc, [ch 1, dc] twice) all in next sc, skip next sc, sc in next sc; repeat from * around; join with a slip st in first sc. *** Fasten off.
Attach Cuff
With right side facing and smaller hook, join C at upper edge of back seam of cuff; ch 1, sc in first sc, place cuff over right side of stocking and beginning at first st after back seam of stocking, work 21 sc through both layers at same time, sc in next sc of cuff only, sc in next 21 sc through both layers, sc in last sc of cuff only; join. Fasten off.
Top Edging
Work same as Lower Edging from *** to ***, ch 12 for hanging loop, slip st in first sc again. Fasten off. Weave in all ends.
Abbreviations
- A, B, C
- color A, B, C
- ch
- chain
- dc
- double crochet
- mm
- millimeters
- sc
- single crochet
- st(s)
- stitch(es)
- tog
- together
- yo
- yarn over
- * or ** or ***
- repeat whatever follows the * or ** or *** as indicated
- []
- work directions in brackets the number of times specified
Read NextDoggone Cute DIY Christmas Stocking
Your Recently Viewed Projects
Thanks for your comment. Don't forget to share!
SissieSass
Sep 28, 2018
The fancy cuff on your stocking is so adorable. I want to make a ton of these stockings because they are so pretty. I love that you kept it simple. Traditional holiday colors are awesome, right? I love to make crafts with the trio of colors. It reminds me of holiday crafting with my mom.
Report Inappropriate Comment
Are you sure you would like to report this comment? It will be flagged for our moderators to take action.
Thank you for taking the time to improve the content on our site.