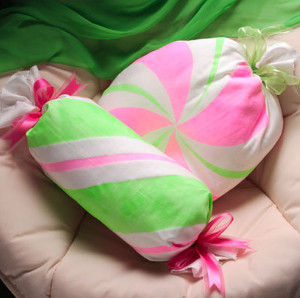
Sweet Holiday Candy Pillows
Looking for a cute DIY Christmas craft? You are in for a treat with these Sweet Holiday Candy Pillows. This tutorial shows you how to make a pillow that looks like a delicious holiday sweet. These cuddly homemade pillows are different from the typical seasonal greeting or snowman throw-pillow, and are simple, yet unique enough to make them the perfect addition to your DIY Christmas decor. You can also use them as a DIY holiday gift since they are seasonally appropriate, yet can blend into regular home decor styles. Friends and neighbors will adore these cute and comfy confection-inspired pillows.

Materials:
- Tulip® Fabric Spray Paint Neon
- Pinking shears
- Scratch paper
- 2 Pillow forms, 1 ea. round and roll
- ¾ yd. White fabric per pillow
- Safety pins - optional
- Self-adhesive shelf paper
- Scissors
- Plastic trash bag, large
- Ruler
- Paper towels
- 1-½ yds. Neon pink or lime ribbon
- Permanent felt pen
- Iron
- Needle and thread, white
- Pattern 1
- Pattern 2
Instructions Roll Pillow:
-
Cover work surface with trash bag.
-
Iron fabric smooth.
-
Cut several 3-½” wide strips from paper towels. Lay two or three strips to form diagonal stripes across center of fabric. Lay more strips about 4” from first on both sides. Measure a 24” by 26” rectangle and place paper towels along line.
-
Start Lime spray on paper towel to get feel of spray. Spray an even coat of Neon Green Spray Paint between paper towels. Let dry. If desired, apply a second coat for more intense color. Remove paper towel strips and let dry.
- Cut more strips of paper towel. To create lines of pink between; line up paper towel just off center along white diagonal stripe. Add another opposite first creating about an inch space between. Cover remainder of fabric with paper towels to prevent overspray. Spray with Neon Pink. Remove towels then repeat with remaining stripes. Let dry.
Instructions Round Pillow:
-
Cut off a length of self-adhesive shelf paper. Place paper, shiny side up on work surface. Place pattern under paper then use felt pen to trace four wedge shapes, and cut out.
-
Iron fabric smooth and place on plastic trash bag. Remove backing from a section of shelf paper and place in center of fabric, with pointed end toward center. Remove backing from next piece then press in place touching tips. Add remaining pieces equaling spacing in circle.
-
Add paper towels around edge to prevent overspray. Start Neon Pink spray on paper towels then spray fabric sections. Let dry and re-spray for a more intense color. Let dry then carefully remove shelf paper designs.
- Trace inner stripe pattern on center of scratch paper and cut out. Center design on white section of fabric. Cover remaining fabric with paper towels then spray Neon Green in design. Move to next section and repeat step. Finish with remainder of sections. Let dry.
Instructions Assembly:
-
Place pillow form in center of fabric and wrap with remaining fabric, overlapping in back about 3”, trimming excess fabric if needed. Fold under edge and sew in place for permanent closure or use safety pins for a temporary closure.
-
Cut yard lengths of ribbon. Gather fabric at ends of pillow then tie ribbon around and tie a tight knot to hold in place. Tie ribbon in bow and trim ends in “V”.
- Use pinking shears to trim excess fabric on ends.
Read NextMoose Bitty Bumble
Your Recently Viewed Projects
Thanks for your comment. Don't forget to share!
SissieSass
Oct 31, 2018
How adorable are these little pillows? When you have little girls coming to stay over the holidays, these pillows are just the thing to make them feel welcome. I love the bright colors you chose too. I think it makes the design more fun and exciting. Plus you can use the pillows to accent a tree or a bed with no problem.
Report Inappropriate Comment
Are you sure you would like to report this comment? It will be flagged for our moderators to take action.
Thank you for taking the time to improve the content on our site.