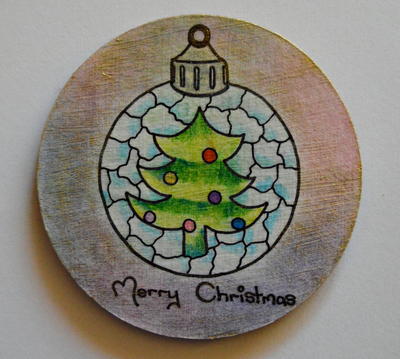
Adult Coloring Turned Christmas Coasters
If you're wondering what to do with coloring pages, try this.

If you're wondering what to do with finished coloring pages, especially Christmas coloring pages, look no further than the Adult Coloring Turned Christmas Coasters project! This beautiful idea features basic decoupage, and it puts those coloring pages to good use.
From the designer: "If you love adult coloring, then this project will definitely grab your attention! Color these Christmas themed images and once colored, turn them into coasters. Use the coasters to spread some cheer, or use them as fun-to-make stocking fillers."
Estimated CostUnder $10
Time to CompleteIn an evening
MaterialsPaper, Wood
Primary TechniqueColoring

Project TypeMake a Project
Materials List
- Two printouts of the provided adult coloring page
- Six round laser cut wooden coasters, each 3mm thick and with a diameter of 95mm (3.6”)
- Felt in a matching color to glue to the bottom of the coasters
- 24-color set of marco raffine watercolor pencils
- Mod Podge
- Rolkem super gold dusting powder
- Quick-drying clear gloss spray varnish
- Clear-drying craft glue (such as bostik clear)
- Old newspaper to protect the working area
- Standard scissors
- Two paintbrushes
- Hairdryer
Instructions:
-
Working dry on dry, color the images on the printouts of the provided adult coloring page.
-
Cut out all the colored images.
-
Paint a thick layer of Mod Podge over the front of the first coaster. Keep the edges and the back of the coaster clean.
-
Carefully place a colored image on to the coaster, the right side of the image facing upwards.
-
Working from the middle of the image, and from the inside towards the outside, use the paintbrush to rub out all the air bubbles and excess Mod Podge from the back of the image. Be careful not to stretch or tear the image. Regularly dip the paintbrush into the bottle of Mod Podge to keep it wet while rubbing, as this will prevent the image from tearing. Check that the image sticks properly to the edges of the coaster.
-
Dry the coaster thoroughly with the hairdryer.
-
If necessary, cut off any paper that protrudes beyond the edges of the coaster.
-
Paint a thin layer of Mod Podge over the front of the coaster and dry it with the hairdryer again.
-
Repeat step 8 three more times ~ you need to apply at least 4 coats of Mod Podge, but remember that with every layer, the direction in which the Mod Podge is applied, must be changed from horizontal to vertical to horizontal. Also, remember that after every layer of Mod Podge, the coaster must first be dried thoroughly with the hairdryer.
-
Use the second dry paintbrush and the gold dusting powder to add an uneven gold shimmer to the outer rim and edge of the coaster.
-
To protect the coaster and allow easy cleaning, apply one coat of the quick-drying spray varnish, and allow to dry thoroughly.
-
Cut the felt to the correct size and glue to the back of the coaster, so that the project will have a neat finish.
-
Complete the rest of the set of coasters in the same way.
Your Recently Viewed Projects
Thanks for your comment. Don't forget to share!
Morehouse17
Oct 31, 2017
These are beautiful coasters. This is one way that those adult coloring pages can be used daily. I myself find coloring to be very relaxing but I just cannot find the time to color. What will all the crochet, sewing and knitting I do. Here is an opportunity to but the needles down and pick up the coloring pencils and wind up with a project that I can proudly display.
Delphine Bryant
Sep 30, 2017
What a clever way to make coasters. The idea does not have to be limited to using adult coloring pages. Involving the children and their work would be a great family project. The children will probably be more like to use any coaster if they helped in making them. Can be done for all seasons or events.
Report Inappropriate Comment
Are you sure you would like to report this comment? It will be flagged for our moderators to take action.
Thank you for taking the time to improve the content on our site.