Jingle Bell Sleigh
Fill the air with sounds of Christmas cheer with a Jingle Bell Sleigh. Your friends and family won't be able to resist singing Sleigh Bells once they see this beautiful handmade Christmas craft. You can use it as a decoration or give it as a DIY Christmas gift to someone special.

Materials:
- Sharp scissors
-
6"X4"(that is measuring from the top) plastic container
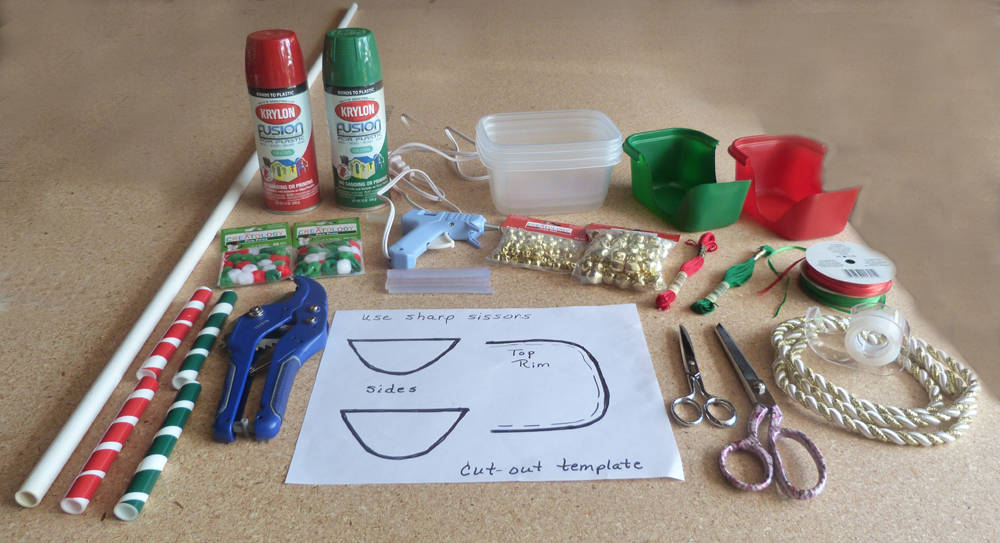
- Red or Green plastic spray paint
- 1/2" white pvc pipe cut into 6" lengths or 6" candy canes (pvc pipe cutter is necessary for this to be a clean cut)
- Red or green vinyl electrical tape
- 1/2"- red and green pom poms
- Glue gun, and glue sticks
- 1/4"-or 1/2" trim (be sure and tape the ends before cutting-the length will be about 15-17" for each sleigh)
- 4" of embroidery floss
- Jingle bells in 2 sizes-9mm and 15mm
- 3mm width spools of red and green ribbon
Instructions:
-
Trace template for sides on the plastic container with a marker
-
Cut off the partial top rim first (this will make it easier for tracing the side cut outs)
-
Choose the color of plastic spray paint you wish the sleigh to be and spray in a ventalated area (do not overspray or spray too close to the container)
-
Allow it to dry completely (overnight is best)
-
If using candy canes, glue them to the bottom of the container with the curve of the candy cane in front of the sleigh. If you use the pvc pipe, cut them in 6" lenghts, and wrap them with electrical tape at an angle to resemble a candy cane design
-
Glue the inside of each end of the pipe with a pom pom (the opposite color of tape)
-
Cut the embroidery floss into 3--4" lengths, threading it through the 3 larger bells
-
Attatch them with your glue gun (evenly spaced in the center of the front)
-
Using one end of the trim, begin gluing it to the edge of the rim (you can push the trim under the lip of the rim so the tape doesn't show), and glue onto the edge of cut sides, covering the ends of embroidery thread as you go (make sure your bells are on the outside front)
-
Glue 3 small bells together, place them on the edge of each side of the rim
-
Make a bow with the small ribbon, gluing it above the 3 small bells
- Once you have finished, make sure any stray glue stick threads are removed and fill the sleigh with your choice of items
Read NextHuggable Penguin Crochet Pattern
Your Recently Viewed Projects

Thanks for your comment. Don't forget to share!
bustedinnc 0512678
Mar 01, 2017
I LOVE Christmas! and Christmas crafts! These are the perfect thing for our Christmas in July party this year. General decorations or maybe centerpieces. I was reading the directions and saw a few things that I'm unclear on. Is there a template available? I saw one in the picture but didn't see a link. Would mini glue dots work for attaching the small bells together? Would the ribbon work for hanging the bells on front?
Weberme
Sep 28, 2016
What a cute jingle bell sleigh to make for your Christmas decoration for under your tree or on the mantel for a scene. This is a good way to use some of your plastics you are throwing away or some leftover trim pieces. I really like the little bells on the front it gives the sleighs some character. You can use some leftover embellishments to add more decor on them. Fill the sleigh with some homemade small ornaments made with leftover things in stash box. Nice tutorial.
Report Inappropriate Comment
Are you sure you would like to report this comment? It will be flagged for our moderators to take action.
Thank you for taking the time to improve the content on our site.